StangerSite � 2008 All pictures, diagrams, text and illustrations are the property of StangersSite and may not be copied or reproduced without the express written permission of the Webmaster |

STEERING SYSTEM |
This section pertains mostly to the Bendix-style power cylinders used on Ford passenger
cars from 1961-1978 |
Rebuilding the Ford/Bendix Power Cylinder |
Seal kits are readily available for the Power Cylinder but the instructions (if any)
are very poor. Even the Ford shop manual doesn't provide a "real world" description
of how to re-seal the cylinder. Their instructions are more for warranty
replacement of fairly new cars and not for a 25+ year old cylinder with hardened
seals and corrosion buildup. There are two areas of difficulty in re-sealing a Power Cylinder; getting the old pieces out and not damaging other areas in the process. |

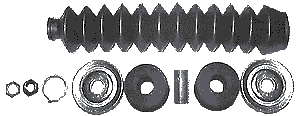
LOWER SEAL |
SPACER WASHER |
UPPER SEAL |
SEAL RETAINER |
WIPER SEAL |
WIPER RETAINER |
RETAINER CLIP |
There are two identical seals used to seal the Rod as well as a Rubber Ring meant
to "squeegee" the Rod clean before it slides through the seals. Removal of the
Plastic Retainer can be difficult depending on whether it is still elastic or
has become brittle. Many "How-To" articles suggest forcing compressed air into
the Cylinder to blow the Seals out of the end of the Cylinder. This doesn't work.
Not enough air can get to the back side of the Seals to blow them out, and what
little does get behind the Seals just leaks past them because they are worn.
You can dig them out with a pick but care must be taken not to punch the pick
into the Metal Washer under the first Seal. This will often expand the Metal Washer
enough to cause it to bind inside the Snout or bind on the Rod. If you dimple
the metal around the hole that the Rod comes out of, you can distort the hole
enough that the Rod will bind in it and not slide freely, scratching the Rod
surface. If this occurs the Cylinder is ruined. |
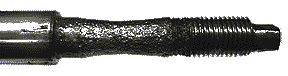
STUD DAMAGE |
The Stud can become worn and loose in its socket, but it is most often damaged by
improper removal. If the Stud has actual play in its socket, the Cylinder is ruined.
If the threads are damaged or the end flared out, it may be repairable.
This is often difficult since the Stud twists easily in its socket and is hard
to clamp to keep it from rotating while trying to clean the threads with a die. |
SWIVEL STUD END IS WELDED ON IF STUD IS DAMMAGED BEYOND REPAIR, STUD END MUST BE REPLACED |
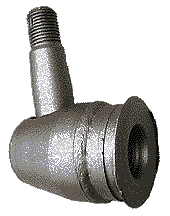
Ford used Bendix brand power cylinders throughout the 1950's. There were different
mounting styles, and most used only a single true oil seal, but by the early
1960's Ford began to use a double-seal cylinder that they stayed with for nearly
twenty years. There were several variations of these cylinders (see Power Cylinder Pictures), but their basic construction and seal structure was the same. |
The problems to look for on the late Ford/Bendix power cylinders are: |
Rod wear and damage, caused by the rod being bent, exposure due to torn or missing
boot, and hardened seals Cylinder damage, caused by running over or bottoming on something Swivel stud damage, caused by improper removal |
Any cylinder that has any of the following symptoms will have to be replaced: |
Rod shiny surface worn through, pitted, rusted or scratched in the area that slides
in the seals Rod end that is so badly rusted away that the end is thin and weak The rod binds or jams up somewhere in its travel inside the cylinder Swivel Stud is loose in its socket |
Problems You May Encounter ( And not really be aware of ) |
Rebuilding a Ford/Bendix Power Cylinder unit is seldom an easy thing to do. Before
you consider or attempt a rebuild, there are some problem areas you should be
aware of. This first part is not designed to scare you off from attempting your
own rebuild (well, maybe just a little), but to show you what you may encounter
along the way. We have done many power cylinder rebuilds and see these problems
on an almost daily basis. These are the things not mentioned in any instruction
sheet or shop manual. |
Rebuilding the Power Cylinder |
Can you rebuild your own power cylinder? It depends. It depends on the condition
of your cylinder and rod, how you remove it from the car, how good of a rebuild
kit you are using, and how good the instructions are. Any one of these items can
cause you trouble and many cylinders have at least one of these problems during
a rebuild. The biggest problem is - you don't know what condition your parts
are really in until you remove the assembly from the car, tear it down and inspect
it. By that time you are into it pretty deep and will have to decide whether
to continue on your own or turn it over to a professional. |
By definition, a rebuild means that there are some parts you will retain while reconditioning
them to proper working order. There are several important parts inside
the power cylinder that are not accessable and that are not a part of a rebuild
kit and these are the parts you hope to reuse. Unfortunately, these parts
are often damaged due to rust, wear or improper removal/installation. We will
start with the areas that are universal to all power cylinders and are most often
damaged. |
Now, certain rebuilders have the resources to replace the rod in the power cylinder.
This involves cutting the cylinder apart at the welds, installing a specific
design rod and piston, and then carefully re-welding the cylinder back together.
Needless to say, this is a fairly costly process in both parts and labor. Currently,
there are several companies making new reproduction power cylinders for
popular applications such as the 1965-1970 Mustangs. It is generally more cost
effective to purchase a new cylinder for these cars than to have a new rod installed
in an original cylinder. Unless you are trying to retain your original
numbered and date coded power cylinder for show purposes, it is usually better
to buy a new replacement cylinder or search for another rebuildable core. |
Frankly, getting the old seals out without damaging the rod surface or the inside of the snout where they sit, can sometimes
be very difficult. This is often due to corrosion of the area inside the snout
and the "spreading out" of the pieces as you attempt to spear them and pry them
out. If you attempt to replace the seals and components on your own, try to
avoid if at all possible to scratch or score the smooth surface of the rod so as
not to damage the surface the new seals will slide on. |

STUD and THREADS DAMAGED FROM IMPROPER REMOVAL |
In Summary ... |
If the major hard parts of your Power Cylinder are in good condition, you have a
rebuild kit with all the seals, sets, boots and bushings that your Cyinder will
need, you have a good set of instructions to show you how to disassemble and re-seal
your Cylinder, and you have the tools and skill to do all the needed work
yourself - then you can probably rebuild your own Power Cylinder. If you are not confident that you can replace the seals without damaging the Rod or cylinder Snout, are not sure which external pieces your Cylinder rebuild will require, are not sure if you can remove and replace the Hose Seats, and have damaged threads on the Stud and Rod end - then you probably should consider having your Power Cylinder professionally rebuilt. If your Power Cylinder is dented and the Rod binds inside it, the Rod is bent and binds when moving in and out of the Cylinder, the Stud has play and clearance in its socket, the Rod surface where it goes through the seals is pitted, scratched or worn through, or the Rod end is eaten away with rust - then you should consider scrapping your Cylinder and buying a new one. |
For knowledgeable and professional rebuilding of Power Cylinders and other power
steering parts, go to REBUILDING SERVICES for more information |
If you are in the middle of a rebuild, or are thinking of doing one on your own,
we will be glad to help you as best we can. Because we are busy rebuilding during
the day, we cannot always help you by phone. But if you send us an email with
a description of your problem, we will try and get back to you within 24 hours. |
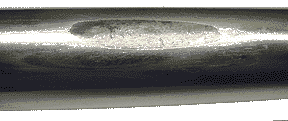
ROD DAMAGE |
The Rod has a hard-chrome finish that must remain free of any damage from wear, corrosion
or abrasion. It must be perfectly straight to prevent binding in the cylinder
housing and excessive wear. If any part of the Rod is damaged in the area
where the Seals slide, the Rod must be replaced. This involves cutting the Cylinder
apart and welding back together. If the Rod is damaged on the frame mount
end by corrosion or physical abuse, it must be replaced. |
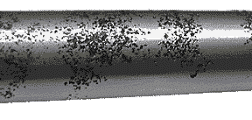
TYPICAL RUST PITTING |
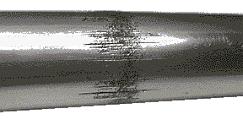
SCRATCH MARKS |
DEEP RUST PITTING |
CHROME SURFACE WORN THROUGH |
FRAME MOUNT END OF ROD RUST DAMAGED FROM BUSHING SPACER |
HOSE TUBE SEATS |
Rebuild kits for Power Cylinders do not usually come with replacement tube Hose Seats
included. Some national name-brand rebuilders do not even bother to replace
Hose Seats when doing a rebuild. It is not a competent rebuild without installing
new Hose Seats. The old seats will almost always have grooves worn into them
from the flare of the hoses. Most are badly grooved from over-tightening of
the hose fittings or the twisting action of the hose flare against the seat while
tightening down the fitting. Even if new hoses are installed, chances are great
that they will leak if installed on old Hose Seats. The Hose Seats must be installed without any damage to their sealing surface. Be aware, if you install them the way the Ford shop manual says to, you will damage them and shed metal into the Cylinder. They should be pressed into place while leaving the flared surface free of scratches, nicks or grooves.. |
HOSE SEAT WITH GROOVING FROM HOSE TUBE FLARES |
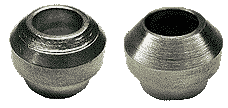
NEW HOSE SEAT WITH SMOOTH ANGLED SURFACE |
There are two major ways the swivel stud is damaged. First is by hammering on the
end of the threads trying to pop the stud out of the centerlink. The second is
by using a "pickle fork" to perform the same task. Never do either of these actions as it will almost always cause greater damage. Using a pickle fork to pull the swivel stud out of the centerlink will tear the
stud boot and may pull the stud out of its socket in the cylinder. Use the proper
tools to remove the cylinder from the centerlink. If you are not sure how to
do this, see the section on Special Tools for more information. |
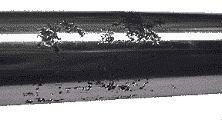
All the rust pitting and scratch marks are caused by driving the car with a torn
or missing stretch boot. This allows dirt and moisture to get to the rod and allow
corrosion to start. Dirt on the rod is "squeeged" off by the wiper seal, but
eventually dirt becomes impreganated in the seals and will cause scratch marks
in the rod surface. The wear-through of the shiny rod surface is due to the rod
being bent and rubbing on the metal surface of the hole in the end of the cylinder
as it goes in and out. All of these conditions will quickly destroy and
new seals that are installed, so it is a waste of time to re-seal a cylinder with
rod damage. |
PISTON and TUBE DAMAGE |
If the inner tube walls are rough and pitted from rust, the Cylinder is ruined. If
the Piston has become too worn to seal sufficiently, it must be replaced. This
involves cutting the Cylinder apart and welding back together. With the Cylinder
empty of fluid, put your fingers over the two hose port holes and move the
Rod in and out of the Cylinder. If you can feel a suction and pressure on your
fingers, and there is resistance to the movement of the Rod, the Piston is probably
good inside. If the Rod moves in and out easily with little resistance, the
Piston is worn out and must be replaced. If there are deep dents in the tube body of the Cylinder, and the Rod binds up at some point inside, the inner tube has been crushed and the Cylinder is ruined. |
BOOTS and BUSHINGS |
Though they don't always come with a rebuild kit, the Stud Boot and Stretch Boot
should always be replaced if damaged or torn. Both of these boots go a long way
in protecting and sealing the Cylinder from the elements. The bushings where the
Rod end mounts to the Frame Bracket must be in good condition to prevent looseness
which will cause severe wear and to seal out water which will rust and damage
components. |
Keep in mind - the outside of the cylinder that you can see, is not the cylinder
that the piston slides in. There is an inner cylinder where the piston is. The
outer part that you see acts as a transfer section for the fluid to get to one
end of the inner liner. Just because there is a dent on the outer cylinder does
not mean the inner cylinder is similarly dented and damaged. With all the fluid
drained from the cylinder, see if the rod moves smoothly all the way in and out.
If it moves smoothly without sticking or binding, then the inner cylinder is
still round and the unit is usable. See How A Power Cylinder Works for a cut-away picture of how the cylinder is assembled and works. |
The Swivel Stud Boot seals moisture from the stud socket. There is no grease fitting
for this socket, so what ever grease is in it when the boot goes on is all
it gets. Fortunaely, the stud requires very little lubrication as it moves in a
very short arc and pivots only slightly in its socket. As long as it is not hammered
on and the boot stays intact, it is good pretty much forever. |
The Stretch Boot usually comes in a kit with the bushings and washers that mount
the threaded end of the cylinder rod to the frame bracket. There are two rubber
bushings - one goes on each side of the bracket. Through the center of these bushings,
and slid over the end of the rod below the threads, is a metal sleeve.
This sleeve is to protect the rod in case it comes in contact with the bracket.
Not all stretch boot and bushing kits come with this sleeve. Always be sure to install this sleeve (and grease it) to protect the rod from wear
and corrosion as shown in one of the pictures above. |